

Over the weekend I decided that it was time to redo the stool on the living room. Months ago I purchased it at the St. Lawrence Market for $10, and it was just itching to be made over. So while watching the Sopranos( I am the type of person that always needs to be working on something) I began to rip out the seams and remove all of the staples. Once that was done I had to go all the way of course! P.S. Removing the staples was the most difficult part of this whole process- as in time consuming. I didn't have all of the professional tools that you probably should have to undertake something like this, so I used things around the home. I am not going to do a step by step tutorial however I just want to share some helpful tips, and what I learnt in the process of working on this!
Before you start though I would recommend having the following.
-Iron
- Sewing Machine
-Zipper Foot for pipping
- Fabric
- Thread to Match
- Fusing(I used Muslin, which is definitely not what one should use but it created the stiffness I needed to create really clean lines, especially in the skirt of the stool)
- Seam Ripper
- Staple Gun
- Staple remover(that is the one item I did not have- which would have really helped)
- Good fabric scissors
This is the first piece that I have ever upholstered, so I was really careful to document everything while I was taking it apart just incase I didn't remember how to reassemble it once all of the fabric was removed. Instead of creating a pattern(because that is not a strength of mine) I decided remove all of the main blocks of fabric and one by one I ironed them out. While you are ironing make sure you are taking into consideration the seam allowances, you want it all to look as clean and professional as possible. Then I measured out the pieces of fabric (from the ironed out originals)and cut and ironed them right away so that I didn't have to worry about not remembering. If I were upholstering something with curved lines I am not sure that I would take the same approach, but since all of the seams were straight on this piece of furniture I felt it was the best option.
 |
| Original stool- It looks like cigarette butts have been put out on here, or perhaps worse! Gave me the creeps to put my feet on here!! |
 |
| What I liked about the piece to begin with were the clean lines and I knew with the help of the right fabric it would look polished and expensive!! |
 |
| Always make sure you carefully examine where the seams are, and align them evenly on all sides. |
 |
| I was the most scared to do the piping, but it was actually quite fun, just make sure to always be watching where the zipper foot is otherwise you may end up with something that looks sloppy, and the piping is such a big part of that. |
 |
| All of the seams were done at the same width to create a cohesive and clean finished product. |
 |
| Make sure you take into consideration how the bottom is completed so that you aren't conserned by that once the other details are in order that way if you need to turn it over you won't be worried about getting anything dirty. |
 |
| Looking at how the seams were assembled. |
 | ||
Getting ready to pin the pipping into place.
|

 |
| The final step in the process, before applying the finishing touched to the base- is to sew the pipping to the sides of the seat. That was somewhat painful, you just need to work out the best way comfortable and work with that, otherwise you will end up stabbing your fingers, as I did! |

 |
| So important to have someone helping, so that when you are getting ready to secure the fabric with the staple gun, the fabric is as taut as possible. It will create the best results, and will help keep the object in place. |
 |
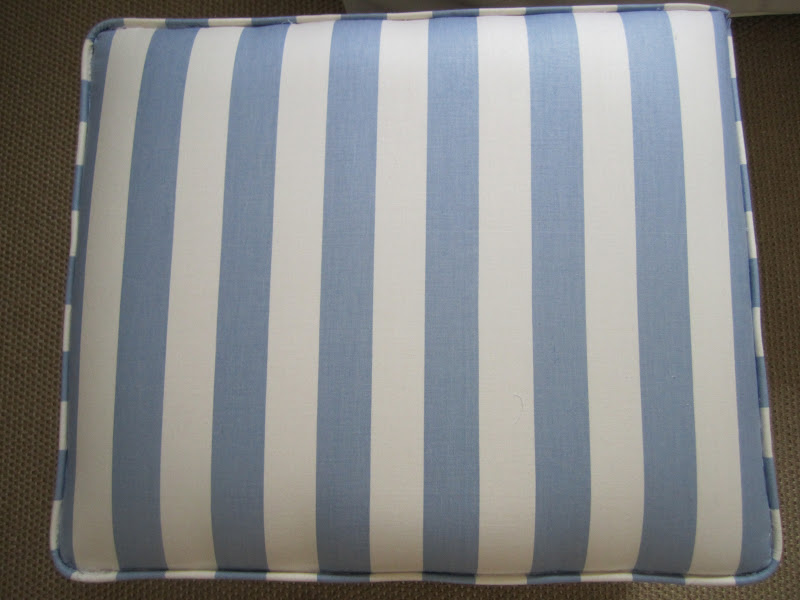
| Finally I love the lines of the footstool, the colors work perfectly with the palette of the room. |
Finally I am really happy with the end result. It was my first ever attempt so I am quite thrilled it will be something we can use, I am thrilled about that. Though the footstool is not perfect- I can see where I could have done it better- I am quite proud of myself and can't wait to take on the next project. It was a labour of love.
Laura Collins Design will provide you with insight and guidance on how you can turn your home or office into a stylish reflection of your unique personality. Please contact me if you are interested in discussing the different design services I offer.
Always Stay Graceful,
That turned out so great. And you matched the piping and stripes too - impressive :)
ReplyDeleteWow Laura! You did a great job. I love the fabric
ReplyDeleteFantastic job Laura!! you got skills girl!
ReplyDeletewooooow I am SO impressed! You did an amazing job!! It looks professional to me. I was going to buy an ottoman the other day but I felt like I would never ever get to reupholstering it. I don't know how to sew, so that definitely makes it tougher haha.
ReplyDeleteRaiana
lifeSTYLE
Thank you so much!!! I thought matching the stripes was going to be really difficult, but it wasn't. What I ended up doing was cut the pieces longer that they should be and then I matched them with the preexisting top pieces, so that it would all be even. But yes, it could have gone wrong very easily!! haha
ReplyDeleteWoah! That looks fantastic!! I can't believe the trim matches up so well with the stripes. So amazing.
ReplyDelete